
window属性
参考:https://developer.mozilla.org/zh-CN/docs/Web/API/Window
caches
返回与当前上下文相关联的 CacheStorage 对象。此对象提供了诸如存储用于离线使用的资源,并生成对请求的自定义响应等功能。具体参考service worker
window.caches.open("v1").then((cache) => {
  return cache.match("/list");
});closed
所引用的窗口是否关闭。
// Check that an opener exists and is not closed
if (window.opener && !window.opener.closed) {
  window.opener.location.href = "https://www.mozilla.org";
}console
Window.console 属性返回对 console 对象的引用,提供了向浏览器控制台记录信息的方法。这些方法仅用于调试目的,不应依赖它们向终端用户展示信息。
assert(assertion,obj)如果断言为 false,则将一个错误消息写入控制台。如果断言是 true,没有任何反应。clear()清空控制台。count(label)以参数为标识记录调用的次数,调用时在控制台打印标识以及调用次数。countReset()重置指定标签的计数器值。debug()在控制台打印一条 "debug" 级别的消息dir()显示一个由特定的 Javascript 对象列表组成的可交互列表。这个列表可以使用三角形隐藏和显示来审查子对象的内容。dirxml()打印 XML/HTML 元素表示的指定对象,否则显示 JavaScript 对象视图error()打印一条错误信息group()创建一个新的内联分组, 后续所有打印内容将会以子层级的形式展示groupCollapsed()创建一个新的内联分组。使用方法和 group() 相同,不同的是,groupCollapsed() 方法打印出来的内容默认是折叠的groupEnd()闭合当前内联分组。info()打印资讯类说明信息log()打印内容的通用方法warn()打印一个警告信息profile(profileName)启动浏览器内置的分析器。profileEnd()停止分析器table()将列表型的数据打印成表格。time()启动一个以入参作为特定名称的定时器,在显示页面中可同时运行的定时器上限为 10,000.timeEnd()结束特定的定时器并以毫秒打印其从开始到结束所用的时间。timeLog()打印特定定时器所运行的时间。timeStamp()添加一个标记到浏览器的 Timeline 或 Waterfall 工具。trace()输出堆栈跟踪。
支持格式化输出:
%o打印 JavaScript 对象。在审阅器点击对象名字可展开更多对象的信息%d打印整数。支持数字格式化。例如,console.log("Foo %.2d", 1.1) 会输出有先导 0 的两位有效数字:Foo 01。%s打印字符串。%f打印浮点数。支持格式化,比如 console.log("Foo %.2f", 1.1) 会输出两位小数:Foo 1.10%c打印内容定义样式
for (let i = 0; i < 5; i++) {
  console.log("你好,%s。你已经联系我 %d 次了。", "小明", i + 1);
}

console.log(
  "This is %cMy stylish message",
  "color: yellow; font-style: italic; background-color: blue;padding: 2px",
);

console.group();
console.log("Level 3");
console.warn("More of level 3");
console.groupEnd();
console.debug("Back to the outer level");

console.time("answer time");
alert("Click to continue");
console.timeLog("answer time");
alert("Do a bunch of other stuff...");
console.timeEnd("answer time");

const errorMsg = "the # is not even";
for (let number = 2; number <= 5; number += 1) {
  console.log("the # is " + number);
  console.assert(number % 2 === 0, { number: number, errorMsg: errorMsg });
  // 或者使用 ES2015 对象简写:
  // console.assert(number % 2 === 0, {number, errorMsg});
}
// 输出:
// the # is 2
// the # is 3
// Assertion failed: {number: 3, errorMsg: "the # is not even"}
// the # is 4
// the # is 5
// Assertion failed: {number: 5, errorMsg: "the # is not even"}cookieStore
功能仅在一些支持的浏览器的安全上下文(HTTPS)中可用。 返回当前文档上下文的 CookieStore 对象的引用,是 Cookie Store API 的入口点。Cookie Store API 的 CookieStore 接口提供了在页面或 Service Worker 中异步设置和获取 cookies 的方法
现存的获取和设置的 cookies 的方法包括将 document.cookie 作为键/值对字符串使用。除了麻烦且容易出错之外,在现代网络开发的背景下它也存在许多问题。
document.cookie 接口是同步、单线程和阻塞的。编写 cookie 时,你必须等待浏览器更新包含所有 cookies 的字符串。此外,依赖 document 意味着访问不到 document 对象的 Service Worker 无法访问 cookie。
Cookie Store API 提供了管理 Cookie 更新的方法。方法是异步和基于 Promise 的,因此不会阻塞事件循环。方法不依赖于 document,所以对于 Service Worker 也有效。获取和设置 cookie 的方法还通过错误消息提供了更多反馈。这意味着 Web 开发人员不必设置后,立即读取 cookie 来检查是否成功设置。
get()通过 name 或 options 对象获取一个 cookie,返回一个兑现为 cookie 详细信息的 Promise。getAll()获取所有匹配的 cookie,返回一个兑现为 cookie 列表的 Promise。set()通过给定的 name 和 value 或 options 对象设置 cookie,返回一个设置成功后兑现的 Promise。delete()通过 name 或 options 对象删除 cookie,返回一个删除完成后兑现的 Promise。change事件当 cookie 发生任何变更将触发 change 事件。
const day = 24 * 60 * 60 * 1000;

cookieStore
  .set({
    name: "cookie1",
    value: "cookie1-value",
    expires: Date.now() + day,
    domain: "example.com",
  })
  .then(
    () => {
      console.log("成功了!");
    },
    (reason) => {
      console.error("设置失败:", reason);
    },
);crossOriginIsolated
指示网站是否处于跨源隔离状态的布尔值。
当响应标头 Cross-Origin-Opener-Policy 的值为 same-origin 且 Cross-Origin-Embedder-Policy 标头的值为 require-corp 或 credentialless 时,网站处于跨源隔离状态。
const myWorker = new Worker("worker.js");

if (window.crossOriginIsolated) {
  const buffer = new SharedArrayBuffer(16);
  myWorker.postMessage(buffer);
} else {
  const buffer = new ArrayBuffer(16);
  myWorker.postMessage(buffer);
}devicePixelRatio
Window 接口的 devicePixelRatio 返回当前显示设备的物理像素分辨率与CSS 像素分辨率之比。此值也可以解释为像素大小的比率:一个 CSS 像素的大小与一个物理像素的大小。简单来说,它告诉浏览器应使用多少屏幕实际像素来绘制单个 CSS 像素。
当处理标准显示器与 HiDPI 或 Retina 显示器之间的差异时,这很有用,后者使用更多的屏幕像素绘制相同的对象,从而获得更清晰的图像。
<canvas>可能在视网膜屏幕上显得太模糊。使用window.devicePixelRatio确定应添加多少额外的像素密度以使图像更清晰。
<canvas id="canvas"></canvas>


var canvas = document.getElementById("canvas");
var ctx = canvas.getContext("2d");

// Set display size (css pixels).
var size = 200;
canvas.style.width = size + "px";
canvas.style.height = size + "px";

// Set actual size in memory (scaled to account for extra pixel density).
var scale = window.devicePixelRatio; // Change to 1 on retina screens to see blurry canvas.
canvas.width = Math.floor(size * scale);
canvas.height = Math.floor(size * scale);

// Normalize coordinate system to use css pixels.
ctx.scale(scale, scale);

ctx.fillStyle = "#bada55";
ctx.fillRect(10, 10, 300, 300);
ctx.fillStyle = "#ffffff";
ctx.font = "18px Arial";
ctx.textAlign = "center";
ctx.textBaseline = "middle";

var x = size / 2;
var y = size / 2;

var textString = "I love MDN";
ctx.fillText(textString, x, y);可以使用window.matchMedia() 检查devicePixelRatio的值是否发生更改
let mqString = `(resolution: ${window.devicePixelRatio}dppx)`;

const updatePixelRatio = () => {
  // 处理设备像素比变化的逻辑
};

matchMedia(mqString).addEventListener("change", updatePixelRatio);documentPictureInPicture
当前文档上下文的 DocumentPictureInPicture 对象的引用,是创建和处理文档画中画窗口的入口点
requestWindow()为当前主浏览环境打开画中画窗口。返回一个 Promise,其兑现一个 Window 实例,代表画中画窗口内的浏览环境。window代表画中画窗口内的浏览上下文enter事件当画中画窗口成功打开时触发。
const videoPlayer = document.getElementById("player");

// 打开画中画窗口。
const innerWindow = await window.documentPictureInPicture.requestWindow({
  width: videoPlayer.clientWidth,
  height: videoPlayer.clientHeight,
});frameElement
返回嵌入窗口的元素,适用于任何嵌入点内嵌入的文档,包括 <object>、<iframe> 或 <embed>。如果窗口未嵌入到其他文档中,或者嵌入的文档与窗口具有不同的源(origin),则该值为 null。
const frameEl = window.frameElement;
// 如果我们处于嵌入状态,则将容器元素的 URL 更改为 'https://mozilla.org/'
if (frameEl) {
  frameEl.src = "https://mozilla.org/";
}frames
一个类数组对象,列出了当前窗口的所有直接子窗口。在 window.frames 类数组中的每一项都代表了窗口对应给定对象的<frame>或<iframe>的内容,而不是 (i)frame DOM 元素(即 window.frames[ 0 ] 与 document.getElementsByTagName( "iframe" )[ 0 ].contentWindow 是相同的)。
var frames = window.frames; // 或 // var frames = window.parent.frames;
for (var i = 0; i < frames.length; i++) {
  // 在这对 frames 的一个 frame 做点什么
  frames[i].document.body.style.background = "red";
}history
History API 通过 history 全局对象提供了对浏览器会话的历史记录(不要与 WebExtensions 的 history 混淆)的访问功能。它暴露了很多有用的方法和属性,使你可以在用户的历史记录中来回导航,而且可以操作历史记录栈中的内容。
length整数表示会话历史中元素的数目state表示历史堆栈顶部的状态的任意(any)值。这是一种不必等待 popstate 事件而查看状态的方式。scrollRestoration历史导航上显式地设置默认滚动恢复行为。此属性可以是自动的(auto)或者手动的(manual)。go()通过当前页面的相对位置从浏览器历史记录(会话记录)异步加载页面back()转到浏览器会话历史的上一页forward()转到浏览器会话历史的下一页pushState()按指定的名称和 URL(如果提供该参数)将数据 push 进会话历史栈replaceState按指定的数据、名称和 URL(如果提供该参数),更新 history 栈上最新的条目popstate事件点击浏览器前进或者后退按钮时触发
// 以下语句都具有刷新页面的效果
history.go(0);
history.go();

// 由于历史原因,该参数存在且不能忽略;传递一个空字符串是安全的,以防将来对该方法进行更改。
pushState(state, unused)
pushState(state, unused, url)

window.addEventListener("popstate", (event) => {
  alert(`位置:${document.location},状态:${JSON.stringify(event.state)}`);
});

history.pushState({ page: 1 }, "标题 1", "?page=1");
history.pushState({ page: 2 }, "标题 2", "?page=2");
history.replaceState({ page: 3 }, "标题 3", "?page=3");
history.back(); // 显示警告“位置:http://example.com/example.html?page=1,状态:{"page":1}”
history.back(); // 显示警告“位置:http://example.com/example.html,状态:null”
history.go(2); // 显示警告“位置:http://example.com/example.html?page=3,状态:{"page":3}”

// 改变查询参数url也可以是URL对象
const url = new URL(location);
url.searchParams.set("foo", "bar");
history.pushState({}, "", url);innerWidth & innerHeight
innerHeight:浏览器窗口的视口(viewport)高度(以像素为单位);如果有水平滚动条,也包括滚动条高度。
innerWidth:窗口的内部宽度。如果垂直滚动条存在,则这个属性将包括它的宽度。获取除去滚动条和边框的窗口宽度,请使用根元素<html> 的clientWidth 属性。
var intFrameHeight = window.innerHeight; // or

var intFrameHeight = self.innerHeight;
// 返回 frameset 里面的 frame 视口的高度

var intFramesetHeight = parent.innerHeight;
// 返回上一级 frameset 的视口的高度

var intOuterFramesetHeight = top.innerHeight;
// 返回最外部 frameset 的视口的高度outerWidth & outerHeight
Window.outerWidth 获取浏览器窗口外部的宽度。表示整个浏览器窗口的宽度,包括侧边栏(如果存在)、窗口镶边(window chrome)和调正窗口大小的边框(window resizing borders/handles)。
Window.outerHeight 只读属性返回整个浏览器窗口的高度(以像素为单位),包括侧边栏(如果存在)、窗口镶边(window chrome)和窗口调正边框(window resizing border/handle)。
下面的示意图展示了 outerHeight 和 innerHeight 两者的不同。 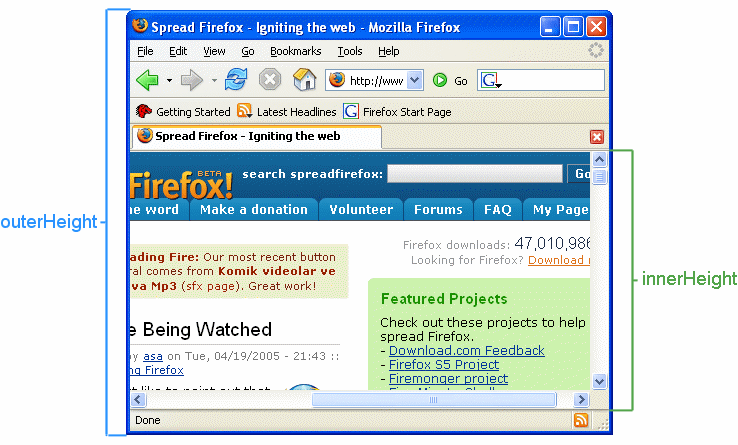
isSecureContext
指示当前上下文是安全的(true)还是不安全的(false)。
localStorage&sessionStorage
只读的localStorage 属性允许你访问一个Document 源(origin)的对象 Storage;存储的数据将保存在浏览器会话中。localStorage 类似 sessionStorage,但其区别在于:存储在 localStorage 的数据可以长期保留;而当页面会话结束——也就是说,当页面被关闭时,存储在 sessionStorage 的数据会被清除。
应注意,无论数据存储在 localStorage 还是 sessionStorage ,它们都特定于页面的协议。
另外,localStorage 中的键值对总是以字符串的形式存储。 (需要注意,和 js 对象相比,键值对总是以字符串的形式存储意味着数值类型会自动转化为字符串类型).
// 表示存储在 Storage 对象中的数据项数量。
localStorage.length
localStorage.setItem("myCat", "Tom");
let cat = localStorage.getItem("myCat");
// 一个数值 n 作为参数,并返回存储中的第 n 个键名。
let cat = localStorage.key(1);
localStorage.removeItem("myCat");
// 移除所有
localStorage.clear();location
尽管 Window.location 是一个只读 Location 对象,你仍然可以将字符串赋值给它。这意味着可以在大多数情况下像字符串一样处理 location——location = 'http://www.example.com'——与 location.href = 'http://www.example.com' 等价。
assign(url)加载给定 URL 的内容资源到这个 Location 对象所关联的对象上。reload(isUseCache)重新加载来自当前 URL 的资源。replace(url)用给定的 URL 替换掉当前的资源。与 assign() 方法不同的是用 replace()替换的新页面不会被保存在会话的历史 History中,这意味着用户将不能用后退按钮转到该页面。toString()返回一个DOMString,包含整个 URL。等于href
// Create anchor element and use href property for the purpose of this example
// A more correct alternative is to browse to the URL and use document.location or window.location
var url = document.createElement("a");
url.href =
  "https://developer.mozilla.org/en-US/search?q=URL#search-results-close-container";
console.log(url.href); // https://developer.mozilla.org/en-US/search?q=URL#search-results-close-container
console.log(url.protocol); // https:
console.log(url.host); // developer.mozilla.org
console.log(url.hostname); // developer.mozilla.org
console.log(url.port); // (blank - https assumes port 443)
console.log(url.pathname); // /en-US/search
console.log(url.search); // ?q=URL
console.log(url.hash); // #search-results-close-container
console.log(url.origin); // https://developer.mozilla.org

// 以下相等
location.assign("https://www.mozilla.org");
location.href = "https://www.mozilla.org";
location = "https://www.mozilla.org";

// 通过修改 search 属性向服务器发送字符串数据:
location.search = data;menubar&personalbar&locationbar&scrollbars&statusbar&toolbar
menubar返回 menubar 对象。 personalbar返回 personalbar 对象。 locationbar返回 locationbar 对象。
这是包含布尔值 visible 属性的一组 Window 属性之一,用于表示 web 浏览器用户界面的特定部分是否可见。
出于隐私和互操作性的考虑,如果 Window 是弹出窗口,则 visible 属性的值为 false,反之为 true。
name
获取/设置窗口的名称。窗口的名字主要用于为超链接和表单设置目标(targets)。窗口不需要有名称。window.name 会调用 toString 将赋给它的值转换成对应的字符串表示。
window.name = Symbol.for("foo").toString(); // "Symbol(foo)"navigation
indow 接口的 navigation 只读属性返回当前 window 关联的 Navigation 对象。导航API提供了初始化、拦截和管理浏览器导航操作的能力。它还可以检查应用程序的历史条目。这是以前的web平台功能(如history API和窗口)的继承者。它解决了它们的缺点,并且专门针对单页应用程序(spa)的需求。
// 拿到所有历史记录
let currentNavEntries = window.navigation.entries();opener & parent
opener:返回打开当前窗口的那个窗口的引用,例如:在 window A 中打开了 window B,B.opener 返回 A. parent:返回当前窗口的父窗口对象。如果一个窗口没有父窗口,则它的 parent 属性为自身的引用。如果当前窗口是一个 <iframe>, <object>, 或者 <frame>,则它的父窗口是嵌入它的那个窗口
if (window.opener != indexWin) {
  referToTop(window.opener);
}

if (window.parent != window.top) {
  // 至少有三层窗口
}scheduler
Window 接口的 scheduler 只读属性是使用 Prioritized Task Scheduling(优先任务调度) API 的入口点。返回一个 Scheduler 对象实例,其中包含可用于计划优先任务的 postTask() 和 yield() 方法。
// Check if the prioritized task API is supported
if ("scheduler" in window) {
  // Callback function - "the task"
  const myTask = () => "Task 1: user-visible";

  // Post task with default priority: 'user-visible' (no other options)
  // When the task resolves, Promise.then() logs the result.
  window.scheduler
    .postTask(myTask)
    // Handle resolved value
    .then((taskResult) => console.log(`${taskResult}`))
    // Handle error or abort
    .catch((error) => console.log(`Error: ${error}`));
} else {
  console.log("Feature: NOT Supported");
}screen
返回当前 window 的 screen 对象。screen 对象实现了Screen接口,它是个特殊的对象,返回当前渲染窗口中和屏幕有关的属性。
if (screen.pixelDepth < 8) {
  // use low-color version of page
} else {
  // use regular, colorful page
}

// 输出:
Screen {
  availHeight:1233,
  availWidth:1212,
  availLeft:121,
  availTop:121,
  height:1212,
  width:323,
  colorDepth:24,
  isExtended:true,
  pixelDepth:24,
  onchange:null,
  orientation:{
    angle:0,
    onchange:null,
    type:'landscape-primary'
  }
}screenLeft&screenTop
Window.screenLeft=screenX 是一个只读属性,它返回浏览器左边框到左边屏幕边缘的 CSS 像素数。
Window.screenTop=screenY 只读属性返回垂直距离,单位是 CSS 像素,从用户浏览器的上边界到屏幕最顶端。
sharedStorage
全局只读 sharedStorage 属性返回当前源的 WindowSharedStorage 对象。这是使用 Shared Storage API 将数据写入共享存储的主要入口点。表示标准浏览上下文中特定源的共享存储。
共享存储 API 是一种客户端存储机制,支持未分区的跨站点数据访问,同时保护隐私(即不依赖跟踪 Cookie)。
共享存储 API 为此类使用案例提供了灵活的解决方案。它旨在提供所需的数据存储、处理和共享功能,但无法跟踪和剖析用户。
与其他存储 API 一样,您可以随时写入共享存储。但是,您只能从 Worklet 内部读取共享存储数据。Worklets 提供了一个安全的环境,您可以在其中处理共享存储数据并返回有用的结果,但您不能直接与关联的浏览上下文共享数据。
要从共享存储 Worklet 中提取有用的结果,您需要使用输出门。这些入口用于特定目的,例如从提供的列表中选择一个 URL,以根据共享存储数据显示给用户。面向用户的结果安全地显示在围栏框架内,无法从嵌入页面访问它们。
此功能仅在安全上下文 (HTTPS) 中可用,在部分或全部支持的浏览器中可用。
worklet包含 SharedStorageWorklet 实例,该实例表示当前源的共享存储 Worklet。 包括 addModule() 方法,该方法用于将模块添加到共享存储 Worklet。SharedStorageWorkletrun()执行 Run output gate 操作,该操作已在添加到当前源的 SharedStorageWorklet 的模块中注册。旨在以通用方式用于处理某些共享存储数据。selectURL()执行已在添加到当前源的 SharedStorageWorklet 的模块中注册的 URL Selection 输出门操作。用于根据共享存储数据从提供的列表中选择要显示给用户的 URL
// Randomly assigns a user to a group 0 or 1
function getExperimentGroup() {
  return Math.round(Math.random());
}

async function injectContent() {
  // Add the module to the shared storage worklet
  await window.sharedStorage.worklet.addModule("ab-testing-worklet.js");

  // Assign user to a random group (0 or 1) and store it in shared storage
  window.sharedStorage.set("ab-testing-group", getExperimentGroup(), {
    ignoreIfPresent: true,
  });

  // Run the URL selection operation
  const fencedFrameConfig = await window.sharedStorage.selectURL(
    "ab-testing",
    [
      { url: `https://your-server.example/content/default-content.html` },
      { url: `https://your-server.example/content/experiment-content-a.html` },
    ],
    {
      resolveToConfig: true,
    },
  );

  // Render the chosen URL into a fenced frame
  document.getElementById("content-slot").config = fencedFrameConfig;
}

injectContent();trustedTypes
Window 接口的 trustedTypes 只读属性返回与全局对象关联的 TrustedTypePolicyFactory 对象,为使用可信类型 API 提供入口点。
可信类型 API 为 Web 开发人员提供了一种锁定 DOM API 不安全部分的方法,以防止客户端跨站点脚本 (XSS) 攻击。
客户端或基于 DOM 的 XSS 攻击发生在用户控制的数据(例如表单字段中的输入)到达可以执行该数据的函数时。这些函数称为注入接收器。基于 DOM 的 XSS 攻击发生在用户能够编写任意 JavaScript 代码并由这些函数之一执行时。
Trusted Types API 会锁定有风险的注入接收器,要求您在将数据传递给其中一个函数之前对其进行处理。如果使用字符串,则浏览器将引发 TypeError 并阻止使用该函数。
Trusted Types 与 trusted-types 和 require-trusted-types-for 指令的 Content-Security Policy 一起工作。
Trusted Types API 锁定了可能充当 DOM-XSS 攻击向量的注入接收器。注入接收器是任何 Web API 函数,只能使用可信、验证或清理的输入来调用。注入接收器的示例包括:
- 将 HTML 插入到文档中的函数,例如 Element.innerHTML、Element.outerHTML 或 Document.write()。
- 使用调用方控制的标记创建新的同源 Document 的函数,例如 DOMParser.parseFromString()。
- 执行代码的函数,例如 eval()。
- 接受要加载或执行的代码的 URL 的 Element 属性的 setter。 Trusted Types 将强制您在将数据传递到任何注入接收器之前处理数据,而不是使用字符串。这可确保数据可信。
const escapeHTMLPolicy = trustedTypes.createPolicy("myEscapePolicy", {
createHTML: (string) =>
string
.replace(/&/g, "&")
.replace(/</g, "<")
.replace(/"/g, """)
.replace(/'/g, "'"),
});
let el = document.getElementById("myDiv");
const escaped = escapeHTMLPolicy.createHTML("<img src=x onerror=alert(1)>");
console.log(escaped instanceof TrustedHTML); // true
el.innerHTML = escaped;visualViewport
Window 接口的 visualViewport 只读属性返回一个VisualViewport对象,该对象表示给定窗口的可视视口。
Visual Viewport API 提供了当前页面的视觉视口接口,即 VisualViewport 。对于每个页面容器来说(如 iframe),都存在有一个独立的 window 对象。每个页面容器的 window 对象都有一个独立的 VisualViewport 属性。
与布局视口(layout viewport)不同的是:只有最上层的 window 才有视觉视口(visual viewport)这一概念。因此只有最上层 window 的 VisualViewport 属性才是有效的,其他层的视觉视口属性可看作是布局视口属性的别名。比如,对于一个
<iframe>,其对应的视觉视口属性 VisualViewport.width 相当于对应的布局视口属性,如 document.documentElement.clientWidth.
var visualViewport = Window.visualViewport